Previous lessons have covered the topics necessary to work with dots. There are some a few things we need to know about movies.
1. First, click the Movie Size control (![]() )
on the preview panel or choose the Movie/Size menu to confirm the movie size.
)
on the preview panel or choose the Movie/Size menu to confirm the movie size.

2. Its default value is the same size as Image 1. You can choose any fixed value offered in the popup menu.

Or you may set it to any desired value through Set Custom Size. In the subsequent Options window, enter any desired Custom Size value of the movie. You can turn on the Constrain Proportions switch, in this way when you input a new value as the width (height), the other dimension will be calculated automatically to keep the same proportion.
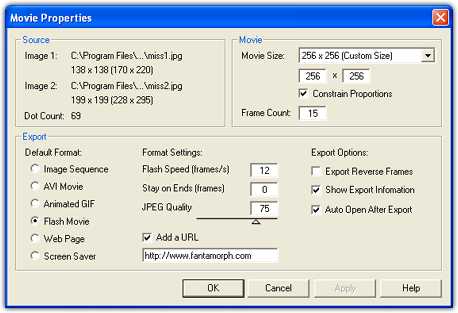
3. The default frame count value is 15 (you can change it
in the Options window). If you want a smoother, more detailed morph
result, simply add more frames. Click the Movie Frames box (![]() )
on the preview panel, then input a new frame count value and press the Enter key.
Alternately, click the Movie Frames Spin Button (
)
on the preview panel, then input a new frame count value and press the Enter key.
Alternately, click the Movie Frames Spin Button (![]() )
to increase or decrease the frame count by one. The maximum frame count value is
999.
)
to increase or decrease the frame count by one. The maximum frame count value is
999.
4. The most important control is the Preview Slider Bar
(![]() ).
Each morph frame from the first to the last can be previewed easily by simply
dragging the
Preview Slider. For example, if you position the slider at the
center, you will preview the frame representing the middle of the morph. If you
position the slider all the way to the right, you will preview the final frame of the morph, which is
essentially Image 2.
).
Each morph frame from the first to the last can be previewed easily by simply
dragging the
Preview Slider. For example, if you position the slider at the
center, you will preview the frame representing the middle of the morph. If you
position the slider all the way to the right, you will preview the final frame of the morph, which is
essentially Image 2.
5. Beginning with version 2.35, the current frame number
will be shown in the Current Frame box (![]() ),
and the current morphing percent will be shown in the Morphing Percent
box (
),
and the current morphing percent will be shown in the Morphing Percent
box (![]() ),
it's especially useful for professional users. Besides, not only morph frame but
also any desired percent of the morph can be previewed from 0% to 100% in 1%
increments by dragging the
Preview Slider.
),
it's especially useful for professional users. Besides, not only morph frame but
also any desired percent of the morph can be previewed from 0% to 100% in 1%
increments by dragging the
Preview Slider.